
 Click here to view old videos.
The Omega Machine Part 3 (Xbox to Jamma)
Time to post again. This time Xbox to Jamma audio. We learned how to hook up video to our Jamma cab from the Xbox, but now we need a cheap way to do Audio.
XBox to Jamma Audio
There’s a cuple ways to do this, but I always strive for the easiest and cheapest mix.
Let’s take a look at where we left off. I made a better diagram of how we hooked up the video.

Now we need a cheap easy way to hook up the audio. Well one might think at first, just hook up the audio pins from the Xbox a/v cord to the Jamma board. This of course, is wrong. The audio from the Xbox is not amplified and a typical Jamma cab has no audio amplifier.
Ya could build a small audio amplifier circuit, but this is too much of a pain in the ass I think. I did it the easy way. Go down to your cheap computer store or thrift store, and pick up some old computer speakers with a built in amplifier (ie. with Volume Control).
Once ya got the speakers it’s time to do some wire splicing. You should have an “audio in” plug that normally hooks up to a PC. This must be spliced and hooked up to the Xbox cable pins.
It’s stereo so you’ll have a wire for the right speaker a wire for the left and a ground. Right is usually red, left is white, and ground is black. Just wire the right and the left together and make it mono. We will call the left and right wired together “audio+”. Your Jamma cab is probably mono. The ground will be called “audio-“.
So wire your audio+ to pin 14 and your audio- to pin 15 on the Xbox a/v cable. Oh by the way you may have noticed I’ve placed jumper wires between pins 1 and 14, and 2 and 15. Pin one is the right audio+ and pin 14 is the left audio+. Pin 2 is the right audio- and pin 15 is the left audio-. So the jumper pins just make the Xbox cable mono.
Next ya cut off the speaker without the audio amp built into it. We won’t need it.
Open the speaker with the audio amp. You’ll see two wires going to the cone speaker itself. One will probably be red or white and the other will probably be black. Cut these wires and remove the speaker. The black is usually the audio- and the red or white is usually the audio+. Solder the audio- to the speaker- pin on the Jamma board and the audio+ to the speaker+ pin on the Jamma board.
Lets take a look at the hookup with the audio and video hookup.
 Now ya should have audio and video on your Jamma cab. Controls should be easy to hook up. But if you need help I’ll probably post later and show ya a cheap easy way to make some arcade controls for our Xbox to Jamma cab.
If your curious as to the restult… Take a look…
[youtube]http://www.youtube.com/watch?v=DGoQBkC6X2Q[/youtube]


 Comment by
  Comment by
  When ya have it open you’ll see wires and crap soldered to it. Well if you get a composite cable with digital audio there will be 3 extra wires hooked up for the digital audio, probably a thin white, thin green, and thin red. Two of these will be used for our composite signal, the third we’ll just desolder.
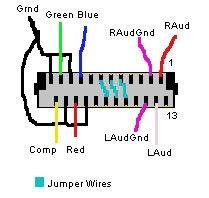 Modify the cable so the soldering is like this. Be sure to add the extra jumper wire in there. As a composite cable, only two will be soldered on when you buy the cable. The Xbox uses these jumper cables to determine the type of output. We need the Xbox in SCART mode not Composite. Just add the third jumper wire to turn it into a SCART cable.The diagram shows the grounds for the red, green, blue, and composite joined together. You can join em at the other end of the cable. Just leave those wires alone for now.
Thanks for the great How-to!
The recent effort being put into coinops 2 has made an XBOX1 a perfect “brain” for a Mame cabinet. I am wondering if the lack of a video amp makes a big difference. I’m considering following your guide but am alson considering the ultimarc video cable which has a video amp too.
July 16, 2011 @ 12:06 PM
Hi.
I need an advice.
So , I’ve alredy the amplifier on my jamma cab, this diagram is ok in order to hook up my xbox to jamma cabinet?
Tnaks a lot.
My xbox is PAL system.
October 6, 2013 @ 4:37 AM
Yeah should be fine. I’m not real sure about the PAL system, but I believe it should work the same.
October 14, 2013 @ 10:22 AM