
 Click here to view old videos.
The Omega Machine (Xbox to Jamma)
Hi, I’m the other member of this blog. But so far no posts. I’m the one that does the dirty work behind the scenes. I’m the tech guy and am currently hooking up an Xbox to a Jamma arcade cabinet for my bro. It’s easy, but figuring it out alone can be a huge pain. Here’s how I did it. It’ll probably work for you, too, if you want to do it. But keep in mind, touching anything in a TV or something with big capacitors or transformers (even while off) will probably not send ya to the hospital if ya touch it in the wrong place, it’ll send ya to the morgue! So if you don’t know what a capacitor is, don’t attempt this. But don’t worry, I avoid all high voltages. And these steps only risk voltage as high as 12V. Just keep in mind if ya touch somethin bad ya could kill yourself inside that arcade cab there.
Step One in Xbox to Jamma – Build a SCART cable…
Sorry if I don’t have too many pics in this beginning here, I’ll describe it well, though.
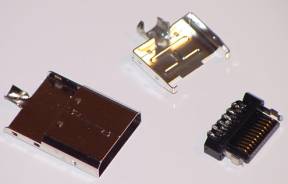
My first step was to get video and audio output from the Xbox to the Jamma cab. Jamma picture tubes use red, green, blue, and composite sync. Well an Xbox doesn’t exactly output the same signals, but it will do most of the work for us.
Foreign Xbox users use a SCART cable which uses RGB with Composite Signal. We can use this but first we need to convert a US Xbox cable to a SCART cable.
Step 1 – Go out and buy a Composite Xbox cable with digital audio – $2.99 used.
I got mine for 2.99 but I think it was priced wrong, they normally cost a bit more.
Step 2 – Cut the end open so you can do soldering. You’ll have to pull the inside out to solder to the pins.
The inside will look like this…
 When ya have it open you’ll see wires and crap soldered to it. Well if you get a composite cable with digital audio there will be 3 extra wires hooked up for the digital audio, probably a thin white, thin green, and thin red. Two of these will be used for our composite signal, the third we’ll just desolder.
The reason we bought a composite cable is so we don’t have to hook up the red green or blue.
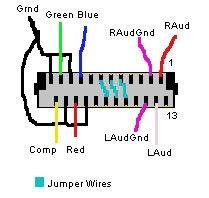 Modify the cable so the soldering is like this. Be sure to add the extra jumper wire in there. As a composite cable, only two will be soldered on when you buy the cable. The Xbox uses these jumper cables to determine the type of output. We need the Xbox in SCART mode not Composite. Just add the third jumper wire to turn it into a SCART cable.The diagram shows the grounds for the red, green, blue, and composite joined together. You can join em at the other end of the cable. Just leave those wires alone for now.
Basically to sum it all up, leave it all as it is but find the thinner wires. There should be three: a red, white, and green. Desolder the green, solder the red to where it says Comp, and solder the white to the pin right beside of the Comp for the Comp Gnd. Now our thin red wire is our Composite Signal and the white is the Composite Ground. Finally solder the jumper pin as it shows. You’ll know how to do it cause it’ll look like the other two already hooked up. You’ll need a small piece of wire for this.
Your all done here so put everything back together and melt the rubber of the video cable back together where you cut it. Just about as good as new.
Finally splice the other end of the cable. You’ll have thick red, thick white, thick yellow, thick green, thick blue, thin red, thin white, and thin green. Splice the thicker wires. They’ll have two wires in one, inside of each wire is a white wire. The outside wire (not the white one) will be the grounds. Take the grounds from the video wires and put em together and add the thin white wire to it (comp gnd). There we go, now we have a partially finished RGB cable.
Here’s a diagram of the wires…
Yellow,white – Red Signal
Yellow outside – Gnd
Green,white – Green Signal
Green outside – Gnd
Blue, white – Blue Signal
Blue outside – Gnd
Thin Red – Video Composite Signal
Thin Whie – Gnd
Thick Red,white – Right Audio
This Red outside – Right Audio Gnd
Thick White,white – Left Audio
Thick White outside – Left Audio Gnd
Well we got RGB, Comp Signal, Right and Left Audio.
The jamma needs RGB, Composite Sync, and Mono Audio.
Our next step will be to get Composite Sync outta that Composite Video. For this we will need a LM1881N chip. I found one on Ebay for 6 bucks with shipping.
I’ll show you how to do this in my next post. Next step, separate composite sync from composite video.